isabeli-k

Because not all Kangaroos
are Astronauts…

Project Theremin

  • About TensorFlow

    What is TensorFlow?

    TensorFlow is a powerful, open-source software library designed for machine learning and artificial intelligence. It was originally developed by the Google Brain team. TensorFlow was developed using a combination of programming languages:

    1. C++ provides the speed and flexibility needed for numerical computation and optimized tensor operations.
    2. Python acts as a bridge to the underlying C++ code.
    3. CUDA (for GPU acceleration) to execute operations on NVIDIA GPUs. It is a software layer that gives direct access to the GPU’s virtual instruction set and parallel computational elements for the execution of compute kernels.
    4. JavaScript (for TensorFlow.js) to bring machine learning to the web. It is designed to run machine learning models directly in a web browser or Node.js environment.
    5. Swift (experimental). TensorFlow Swift is an experimental project aimed at bringing TensorFlow’s capabilities to Swift.

    For my project, I used ml5.js, a library built on top of TensorFlow.js.


    What is a Tensor?

    Tensors are multi-dimensional arrays with a consistent data type (called a dtype, such as float64, int16, or bool). Tensors are immutable, meaning their content cannot be modified after creation—you would need to create a new tensor to hold different data.


    Tensor Basics

    1. Scalar (rank-0 tensor)
      A scalar tensor contains a single value and has no dimensions or axes. For example, a temperature reading is a scalar value.
    2. Vector (rank-1 tensor)
      A vector is a one-dimensional array of numbers. Each value can be located using its position (index) in the array. For instance, a vector could represent the ages of your students.
    3. Matrix (rank-2 tensor)
      A matrix is a two-dimensional array where elements are identified by two indices. Matrices are widely used in applications like image processing.
    4. Higher-rank Tensors
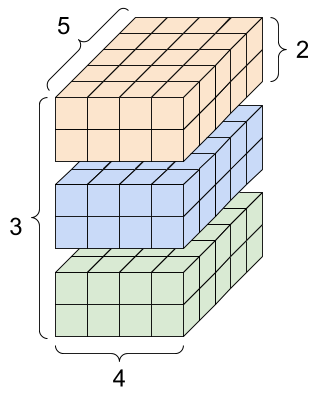
      Tensors with more than two dimensions can be thought of as multi-dimensional grids. For example, a rank-4 tensor with the shape [3, 2, 4, 5] represents a grid with 4 axes. This visualization of a rank-4 tensor is from TensorFlow’s documentation.

    Tensor Shapes

    A tensor’s shape is defined by the number of elements (or length) along each of its axes. For instance, a tensor with shape [3, 2, 4, 5] has:

    • 3 elements along the first axis,
    • 2 elements along the second,
    • 4 elements along the third,
    • 5 elements along the fourth.

    How do we use this in Real Life: Example. Video Processing

    Imagine you’re analyzing video frames to detect objects, and you have a dataset of three short video clips. Each clip contains 2 frames, and each frame is a grayscale image represented as a grid of pixel intensities.

    Explanation of the tensor shape [3,2,4,5]:

    1. 3 (clips): The tensor contains data for 3 video clips.
    2. 2 (frames): Each video clip has 2 frames (images).
    3. 4 (height): Each frame is a grayscale image with 4 rows of pixels (height).
    4. 5 (width): Each frame has 5 columns of pixels (width).

    Example Tensor:

    A tensor of shape [3,2,4,5] could look like this:

    Javascript:
    // Import TensorFlow.js
    const tf = require('@tensorflow/tfjs');

    // Create a tensor with shape [3, 2, 4, 5]
    const tensor = tf.tensor([
    [
    [
    [0, 1, 2, 3, 4],
    [5, 6, 7, 8, 9],
    [10, 11, 12, 13, 14],
    [15, 16, 17, 18, 19]
    ],
    [
    [20, 21, 22, 23, 24],
    [25, 26, 27, 28, 29],
    [30, 31, 32, 33, 34],
    [35, 36, 37, 38, 39]
    ]
    ],
    [
    [
    [40, 41, 42, 43, 44],
    [45, 46, 47, 48, 49],
    [50, 51, 52, 53, 54],
    [55, 56, 57, 58, 59]
    ],
    [
    [60, 61, 62, 63, 64],
    [65, 66, 67, 68, 69],
    [70, 71, 72, 73, 74],
    [75, 76, 77, 78, 79]
    ]
    ],
    [
    [
    [80, 81, 82, 83, 84],
    [85, 86, 87, 88, 89],
    [90, 91, 92, 93, 94],
    [95, 96, 97, 98, 99]
    ],
    [
    [100, 101, 102, 103, 104],
    [105, 106, 107, 108, 109],
    [110, 111, 112, 113, 114],
    [115, 116, 117, 118, 119]
    ]
    ]
    ]);

    console.log("Tensor Shape:", tensor.shape); // Output: [3, 2, 4, 5]
    console.log("Tensor Data:");
    tensor.print(); // Pretty-print the tensor

    // Example: Access the first clip, first frame
    const firstFrame = tensor.slice([0, 0, 0, 0], [1, 1, 4, 5]);
    firstFrame.print();


    C++

    #include <tensorflow/core/framework/tensor.h>
    #include <tensorflow/core/platform/env.h>
    #include <iostream>

    int main() {
    using namespace tensorflow;

    // Create a tensor of shape [3, 2, 4, 5] filled with sequential values
    Tensor tensor(DT_FLOAT, TensorShape({3, 2, 4, 5}));

    // Fill the tensor with some sample data
    auto tensor_map = tensor.tensor<float, 4>();
    int value = 0;
    // Clips
    for (int i = 0; i < 3; ++i) {
    // Frames
    for (int j = 0; j < 2; ++j) {
    // Height
    for (int k = 0; k < 4; ++k) {
    // Width
    for (int l = 0; l < 5; ++l) {
    tensor_map(i, j, k, l) = static_cast<float>(value++);
    }
    }
    }
    }

    // Print the tensor's shape
    std::cout << "Tensor Shape: [3, 2, 4, 5]" << std::endl;

    // Example: Access and print data from the first clip, first frame
    std::cout << "First Clip, First Frame:" << std::endl;
    for (int k = 0; k < 4; ++k) {
    for (int l = 0; l < 5; ++l) {
    std::cout << tensor_map(0, 0, k, l) << " ";
    }
    std::cout << std::endl;
    }

    return 0;
    }

    These examples come from ChatGPT, so thank you!

    Real-life Use Case:

    1. Video Analysis Pipeline:
      • Input Data: The tensor stores the pixel values of the grayscale video clips. Each clip consists of frames with spatial dimensions 4×5.
      • Processing: You might feed this tensor into a neural network to perform tasks like object detection, motion tracking, or activity recognition.
    2. Machine Learning Model:
      A convolutional neural network (CNN) could take this tensor as input, process the frames, and learn patterns across both the spatial (height and width) and temporal (across frames) dimensions to identify objects or actions within the clips.

    And that’s that for now. Next post: Media Pipe Hands, the model I used for my little program.

  • Day… 2? Whatever!

    Sketch First, Code Later: A Hand Pose Adventure 🖐️

    Before diving headfirst into C++ like a headless chicken in a keyboard factory, I decided to start with some good old-fashioned sketching. My lightbulb moment came when I stumbled upon The Coding Train’s Hand Pose Detection video on YouTube. It felt like the perfect jumping-off point for my project.

    A Quick Detour: The Coding Train 🚂💻

    If you’re not familiar with The Coding Train, let me fill you in. It’s this fantastic creative coding community led by Daniel Shiffman, who is, honestly, a national treasure. (I mean, I’m not sure which nation, but let’s just roll with it.) His videos are equal parts educational, inspiring, and downright delightful. I found his channel about a year ago when I was dipping my toes into creative coding, and let me tell you—this guy’s a magician when it comes to explaining complex stuff.

    I was so hooked that I bought his book The Nature of Code a few months later. (Yes, that’s a shameless plug. No, I don’t get commission. Just trust me—buy the book. You’ll thank me later.) If you haven’t already, go check out his YouTube channel or website. Seriously, why are you still here?


    Back to Business

    So, what did I do after discovering that Hand Pose Detection video? Naturally, I watched it, tinkered with the code, and dove into my own version. You can try my take on it here and poke around the code on my GitHub repo.

    But, full disclosure: I am not a JavaScript wizard. I don’t even pretend to be one. This is all about the sketching phase, so bear with me while I explain the tools.


    The Tools 🛠️

    1. p5.js: The Creative Coding MVP

    I’m using p5.js, a lightweight JavaScript library designed for creative coding. It’s open-source, free, and comes with a web editor that’s perfect for experimenting. Of course, you can use VS Code if that’s your thing, but honestly, the p5.js editor gets the job done.

    When you fire up a new p5.js project, it comes preloaded with:

    • index.html (the backbone),
    • style.css (for making things pretty), and
    • sketch.js (where the magic happens).

    Changes to the canvas are done by adding code to the sketch.js file. Every sketch file begins with two main functions: setup() and draw(). Setup runs once, while draw executes 60 times per second (or whatever frame rate you set) to keep the visuals alive.

    2. ml5.js: Thank you for Existing

    For the hand recognition part, I’m using ml5.js, an open-source library built to make machine learning accessible. It’s built on top of TensorFlow.js but has a much simpler API. Bonus: it’s integrated with p5.js! To get it working, I just imported the ml5.js library in my index.html file and loaded the model in sketch.js. So far, so good.

    What Else Did I Build?

    I created an oscillator (super easy with p5.js’s audio tools) and linked it to the hand pose detection. The left hand controls the frequency, and the right hand adjusts the amplitude. And—it works! Well, sort of.

    It’s painfully slow. My first reaction? “F****ng JavaScript, why are you like this?” But hey, challenges make us stronger, right? Let’s see how I can speed this thing up.

  • Day 1

    Here we go…

    Last Saturday, my partner pitched this project idea: “How about making a Theremin emulator that uses a webcam to track hand movements?” Now, if you’re thinking, “What on earth is a Theremin?” — well, welcome to the club! I had to look it up too. A few YouTube videos later, I learned that the Theremin is an electronic musical instrument controlled without physical contact by the performer that produces sounds that could wake the dead and possibly annoy the living. But hey, as a learning project, I figured it’d be great.

    So here we are. First things first, I needed to pick the right tools for the job. After some digging, I decided to go with OpenCV and (hopefully) TensorFlow Lite. Fingers crossed they do the trick (or rather if I can handle them).

    First Commit: After writing some test code, I checked if the webcam was actually working. Success! I then thought, “Great! Now let’s see how fast this thing runs.” I coded a quick FPS counter, and the terminal showed a smooth 31 FPS. Not bad! This project was actually going… well? (Famous last words, right?)

    Now, for some background on my “workstation.” I sit sandwiched between two giant windows: one in front of me, the other behind. Living in the UK, I’m usually blessed with grey, cloudy skies, but today the sun decided to make a surprise appearance. My trusty webcam (a cheap and chearfull Logitech C270, if lsusb is to be believed) was catching direct light from behind.

    Cue my partner, who wandered over to fiddle with the router (I’m apparently the household “Wi-Fi whisperer”). Mid-tinkering, they ended up blocking the backlight from the window. All of a sudden, my FPS reading dropped from 31 to 14. “Huh?” As soon as they moved, the frame rate jumped back up to 31. I realized that the camera performed better when it had my well-lit face to focus on, and worse when the light dimmed. I suppose my glowing personality didn’t quite cut it!

    Here’s the science I uncovered:

    “There’s also a direct relationship between a camera’s framerate and exposure time. Most webcams are going to shoot at 30 or 60 fps. The darker your setting, however, you’ll need a longer exposure time and a wider aperture properly illuminate your shot.

    For all you math-inclined folks, the maximum framerate can’t surpass one divided by the exposure time. So for example, if the max fps of your webcam is 60, but your exposure time is 200ms (milliseconds) to get a well-lighted image, your webcam is not going to run at full fps because it’s working hard to make what’s on the screen as well-lit as possible. In other words, the framerate drops in low light to properly expose the video frames.”

    (Reference: https://www.pcgamer.com/does-lighting-affect-fps-on-webcams/)

    I also discovered my camera can supposedly reach 60 FPS, which means it’s lagging behind. So I have to tweak that… but not today!

    By the way, the woman in the photo below is Alexandra Stepanoff playing the Theremin. 1930.

    Alexandra-Stepanoff